
This might be considered part 2. My first article was on Posterization, both in the darkroom and on the computer. That was a very mechanical "how-to", concerned more with the science than the art of photography. It ended with the comment that "sometimes posterization is only the beginning". (Note - if you are not familiar with posterization and have not read it, you might want to do so before reading this article.)
In this article, I take posterizations One Step Further, again using both darkroom and/or computer techniques. Although most of these techniques can be done in the darkroom, I strongly recommend going digital. It is simply a better, more powerful tool, with no hazardous chemicals to deal with. An evolution of creative photography, if you will.
I have not invented any new techniques here. I have just used combinations of existing techniques creatively, a couple of which I haven't seen printed anywhere. And my hope is that this will inspire you to take your photographs One Step Further...
Posterization, Mask & Montage
This is the only image I've ever done that combines my 2 favorite photographic subjects - Posterization and Utah Landscapes. It's also the only posterization I ever knew what I wanted before I started. It was done in the darkroom and took many months to perfect.
Starting with a shot of Delicate Arch (...you purists will think this is the best shot),
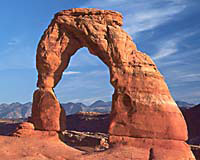
I took it through the standard posterization process to get this:

Not quite what I had in mind, so using clear film and opaque, I tediously created 3 masks so I could selectively posterize different areas of the image - the arch in reds through yellows, the mountains purple and greens, and the sky shades of blue. The final image was 12 exposures!

Psyche-Delicate Arch
This is probably my favorite posterization ever (...it's also one of my favorite titles).
Finally, since I had the sky mask, I was able to drop in completely different images, here a solid sky and a moon.

This was my first ever combination of a posterized image with a real one. It took a lot of time back in the darkroom days, but today the computer makes it much easier (...the lead photo of the Badlands and Balloon filmstrip is my first digital montage posterization).
Tone-Line Posterization
This isn't for armchair photographers. It's tedious to do it in the darkroom, and I haven't quite figured out how to do it on the computer yet (...but I will).
The result of the Tone-Line process looks like a pen and ink drawing. It is achieved by making a high contrast negative, contacting that to a high contrast positive, sandwiching them together (usually with a clear film spacer between them), and contacting that sandwich to another sheet of film (...often while spinning it on a turntable with the light at a 45º angle). What your left with is the line between the negative and positive. I've seen some beautiful examples (...none by me, however).

Fairly standard stuff. But one day it hit me that the posterizations I was doing were matched sets of negatives & positives. Each set could be tone-lined independently and assembled in register to get even more detail to the final tone-line image. Then the real revelation hit me - I could contact each tone-line positive to a negative and use those for my in camera posterizations, giving me a tone-line posterization:
4D
I'm fascinated with 3D images. I don't own a 3D camera, but I do play around with the Pentax 3D adapter. Many years ago, I had an idea to posterize a 3D slide, but that was about the time I mothballed my darkroom. But when I got into digital photography, the computer made the process extremely simple: scan the image, posterize it (...or use PhotoShop's creative filters), print it out, and view it with your 3D goggles. 3D weird! (...or 4D, if you will).

If you uncross your eyes just right, you should be able to see the image in 3D. I apologize for web resolution limitations, but you get the idea. And if you're good at it, you can probably get the above image to go 3D right on the screen.
I'm surprised I haven't seen this technique anywhere, because it cries out to be done. And I might even try to take that one step further by attempting a 3D montage someday.
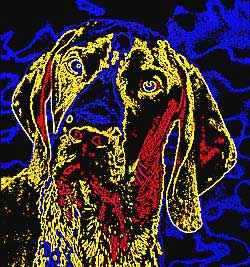
Oops...
The final image was a darkroom mistake - I accidentally flipped one of the tone separations while exposing a posterization. I had no idea I did it until I got the film back. I liked it so much, I routinely started flipping negatives on other posterizations. As far as repeating it in Adobe Photoshop, I haven't tried yet.
The second thing this image shows is posterizing a double exposure. I figured that since I was dealing with weird colors, why not try weird images too.
