Rockaway Township Library Exhibit
Digital Photography, Before & After
Welcome to my first ever exhibit - 15 digital photographs which were on display at the Rockaway Township Main Library (61 Mt. Hope Rd., Rockaway Township, NJ) in September, 1999.
Actually, only 14 of the manipulations are digital - one was created using traditional darkroom techniques. See if you can spot it before reading the descriptions. And while you're at it, see if you can spot the image that never touched a camera - it was created totally in Adobe Photoshop.
NOTE: Roll cursor over image to see the digital version!
 |
Studebaker Bulletnose - A simple posterization (...see posterization page for details). The only twist was the line I added between the colors. |
 |
Rainbow in Bloom - First I traced a mask around each flower and saved it as 2 separate files. I changed one file to grayscale and applied a texture filter. In the other, I used the masks to change the color of each flower. Finally, I used the mask to cut the flowers out of the color file, and pasted them into the B&W file. |
 |
Props - First I traced a mask around the plane and save it. Next I posterized it. Then I cut and pasted a sky out of another photo, and added a texture. Finally I cut and pasted in the jets. |
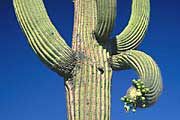 |
Hot Saguaro - First I traced a mask around the cactus and saved it. Then I applied a Poster Edges filter to the cactus, and replaced the sky with a black to blue color gradient and added the moon. The neoning effect was created by "feathering" the mask, filling it with red (...on a separate layer), then deleting the center using the original un-feathered mask). |
 |
Lighthouse - First I traced a mask around the lighthouse. Then I used it to apply a Poster Edges filter to the inside, and a Plaster filter (foreground white, background blue) to the outside. |
 |
Psyche-Delicate Arch - This is NOT a digital photo. It is the most complicated darkroom posterization I ever made - 13 separate color exposures onto a single frame of film. It is also my only successful posterization which combines my two favorite subjects - posterization and Utah. |
 |
Elephant Sunset - This one never touched a camera (which is why there is no rollover "after" picture). I tried to mimic the technique where people take silhouettes and sandwich them with colored gels or out of focus background slides. Neither are photographs if you ask me. |
 |
SunTree - Standard posterization. |
 |
Corn Off The Cob - First I traced a mask around the corn (...which is a lot harder than tracing around a balloon), then I saved it as 2 separate files. One file I changed to grayscale and added a texture filter. The other file I posterized. Then I used the mask to cut and paste the posterized corn into the B&W file. |
 |
Wheelie - First I posterized it. Then I copied the image to another layer and applied a Graphic Pen filter to it. Then I blended the layers by changing the properties of the filtered layer from normal to multiply. |
 |
When the Goblins Come Out - All I did was bump the saturation and add a couple of dots for the eyes, and add the neoning effect (...as described for Hot Saguaro). |
 |
New Horizon - I always wanted to add real photographs to my posterizations in the darkroom, but it was always too expensive and time consuming. But it's easy with a computer. This was my first attempt. |
 |
My Worst Headache - It's really a simple posterization, but I took advantage of the computers ability to blend colors. I left most of the 256 shades of gray as is, but then I replaced the darkest 32 shades with a color range from red to yellow. Then a light texture filter was added to the background. |
 |
You're Too Low, Pull Up, Pull Up - This was my attempt at making an obviously fake picture look real. First I pasted in balloons from another photo. Then I cut the bottom off the larger balloon, mirror copied the top underneath itself, applied a ripple filter, decreased the brightness, and made it semi transparent to look like a reflection. |
|
Flower Power - When you're not in the mood to "work", sometimes you just rummage through the Photoshop filters. This image was essentially two clicks of the mouse - a Poster Edges filter followed by a mode change to Posterize. |